A story in the Chicago Tribune about anaplastology:
http://www.chicagotribune.com/news/local/chicago/chi-silicone-ear-city-zone-10-apr10,0,918896.story
Thanks Scott B. for the link!
Posted by Janet on April 10, 2009
A story in the Chicago Tribune about anaplastology:
http://www.chicagotribune.com/news/local/chicago/chi-silicone-ear-city-zone-10-apr10,0,918896.story
Thanks Scott B. for the link!
Posted in prosthesis | Tagged: anaplastology, Chicago Tribune, news, prosthesis | Leave a Comment »
Posted by Janet on February 20, 2009
I was very excited this week having found out about the IMATS, the “International Make-up Artist Trade Show.” As many readers already know, I was learning how to make facial prostheses as part of my graduate study at UIC. In the past few months I have been making prostheses for patients at the UIC Craniofacial Center (under the supervision of my instructor, of course), but always wanted to do something that involves more creativity. The IMATS, one of the largest gatherings of make-up artists around the world, features all kinds of make-up techniques, including special effects prosthetic make-up. I just read on the exhibitor list that factor II, a supplier of prosthetic materials, will have a booth at the show 😀
The show includes student competitions, a special museum exhibit, speakers, workshops, and more. It takes place this June 20 and 21 at the Pasadena Convention Center at 300 E. Green St. in Pasadena, California. If all things work out, I will be flying out to attend. Tickets may be purchased online here at the advanced prices until May 17.
Click here to watch exhibit videos.
Posted in announcements, prosthesis | Tagged: 2009, IMATS | Leave a Comment »
Posted by Janet on July 21, 2008
If you have seen my posts about the prosthetic ear, I am now taking a continuation of that course this summer. For two classes we made a prosthetic eye. Since summer classes are typically accelerated, we focused on materials and techniques for making the eye and left out any patient-specific parts of the process for the next class. Read on for a summary of this process.
First my instructor demonstrated painting the iris. Here he is attaching an ocular button (the transparent half-sphere with a peg on one end) to an ocular disc, the surface on which we paint iris patterns.

Holding onto the peg of the ocular button, the iris is painted onto the disc.

Later the ocular button is removed (from the back side) and another one is glued to the front side. We used an existing prosthetic eye to make a mold since we were not working from patients. Typically a cast would have to be made from a patient’s eye and the mold would be made from this cast.
From Right to Left: painted ocular disc, ocular disc with ocular button attached to the front, and an existing eye from which we will make a mold.

The mold is covered in tin foil to prevent moisture from contaminating the materials. The ocular button with painted disc (middle in above picture) is placed into the mold, with the peg inserted into the hole in the mold so it would stay in place. White acrylic is prepared and placed into the mold. The mold is then pressed tight and placed in a heat curing unit.

This is what the eye looks like when removed from the mold. It was sanded down until smooth and that the clear part of the ocular button is once again visible. The sclera was tinted slightly and blood vessels added. The eye was then placed back into the mold with clear acrylic covering the front side this time.

Once the acrylic cures, the eye was removed from the mold. The rough edges were sanded away and the entire eye was polished to a high shine.

Posted in my projects, prosthesis | Tagged: prosthetic eye | Leave a Comment »
Posted by Janet on May 19, 2008
I know it’s been a long time since my last post with the prosthesis. There were some major changes with the project schedule, but I finally finished the last part–the extrinsic coloring.
We started by visually analyzing the prosthetic ear from the last step to see how the colors match up with the patient’s skin. Then we decide which colors to apply for a better color match. In my case, the ear came out of the intrinsic coloring process a little too green and yellow, so I will apply various shades of red to even out the tone and bring the ear back to life.
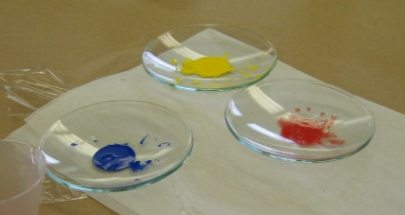
The materials: color pigments and silicone (a different type from the ones used for the intrinsic part of the ear).

I put some pigments on a piece of palette paper and some silicone in a cup. Then I gradually mixed the pigments with silicone using a blunt brush until I got the desired color. The colors can be painted or stippled onto the ear. I found that when I stippled the colors, they tend to stick to parts of the ear in clumps. I actually preferred applying the colors onto the general section and then buffing the colors away using a piece of gauze to create a more subtle transition between the layers. Sometimes buffing the colors can make the ear too glossy, so I’ll reapply some texture by dabbing the ear using a textured surface.

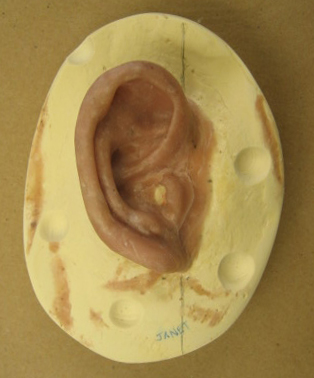
Below: the prosthetic ear completed with extrinsic coloring.

Posted in my projects, prosthesis | Tagged: ear, extrinsic color, prosthesis | 1 Comment »
Posted by Janet on March 24, 2008
The next step in the process–making of the final product, can be best referred to as intrinsic coloring. It is called intrinsic coloring because the color agents are mixed into the material itself and is therefore more permanent than extrinsic coloring, in which the color is painted on top of the material. In this process, the material that makes up the bulk of the prosthesis is mixed with substances for coloring and texture, painting onto the mold in layers, and oven cured. The method presented here is only one of a few methods used to color the ear.
I started first by making a base color, a semi-opaque skin-toned mixture to use for the bulk of the prosthesis. A platinum silicone elastomer, a transparent colorless substance with the consistency of molasses, is mixed with some kaolin clay for increased opacity. Primary colors are gradually added until the color matches the base color of skin fairly well. The base color is determined by looking at the “underlying-most” layer of color on a person’s skin; it is the color you would see on a person’s skin if the skin is stripped of any coloration due to blood vessels, moles, freckles, etc. Occasionally, white pigment is added to increase opacity. Other pigments that closer resemble skin tones can also be added, but is it not necessary to do so. Flocking, short colored fibers, are also added for subtle color change and to texturize the mixture. Tiny red fibers from the flocking can mimic capillaries very well.


Above: Mixing kaolin into silicone, silicone coloring, flocking, and the final base color.
Several other colors mixtures are made to resemble different colors that make up the ear. A small amount of white and yellow was added to a separated portion of the base to make a cartilage color. Three more transparent colors–red, gold, and green, were made the same way but kept transparent by leaving out kaolin clay and white pigments. These colors will be used for the helix and other areas of the ear where capillaries are more prominent, a golden undertone overlying parts of the skin, and shaded areas, respectively.
When all the colors are mixed, they are ready to be painted into the mold layer by layer. A catalyst is first added to the silicone and mixed well. The silicone is then placed on a piece of class and spread thinly for air removal. Afterwards, they are collected back into a small container and painted into the mold by using a paint brush. Each layer was lightly cured in an oven before the next layer was painted on. Occasionally I added flocking and tiny strands of colored yarn between layers to resemble small vessels. The order of which I painted the colors are red, gold, shade, and cartilage color. When everything else was completed, I closed the mold and filled the entire mold with the base color.

Above (cw from top left): Red layer (empty), gold layer, shade layer, base, cartilage color. Everything is sitting on top of glass. In the center, a spatula is being used to spread out a catalyzed red mixture for air removal.
The mold is then pressed tightly for the excess silicone to flow out. It is cured in an oven at 75 degrees Celcius for two hours.

Above: Two molds in a press. Paper towels were places above and below the molds for cushioning.
When the silicone is cured, the mold is removed from the oven and cooled to room temperature. It can be difficult to open the mold even with a separating agent between the pieces.
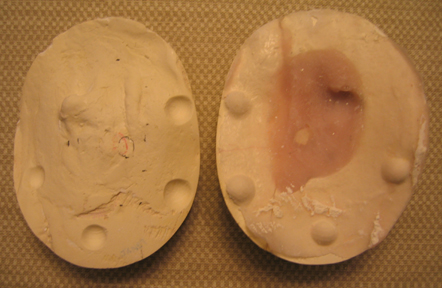

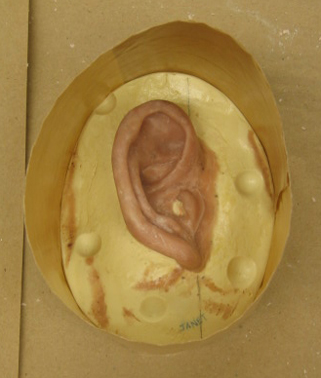
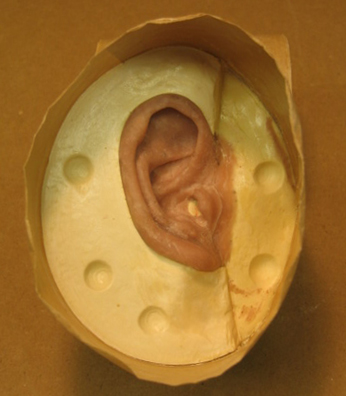
Above Left (Top): An open mold showing the back side of the ear.
Above Right (Bottom): The prosthetic ear as it was when completely separated from the mold.
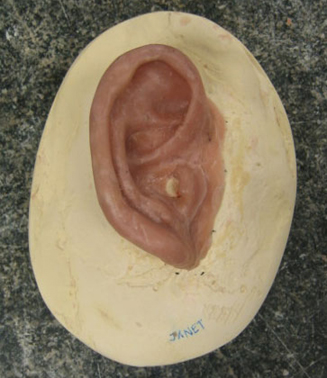
The resulting ear was slightly yellower and greener than intended. Since the layers are painted in reverse order on the mold from outside in, it takes experience and experimentation to get a good match. For my ear, I will be trimming the excess material and refining the coloration using extrinsic colors later.
Posted in my projects, prosthesis | Tagged: ear, prosthesis, silicone | 3 Comments »
Posted by Janet on March 3, 2008
It’s been a while since the I did an entry on the ear prosthesis project. I took my time sculpting and texturing the ear because the quality of the sculpture was essential in determining the quality of the final product. Every time I thought I finished it, I ended up doing more work. Here’s the real final thing (thank goodness!):
From this, I will be making a three-piece mold. The defect acts as one piece, and I will pour dental stone in two more parts–once to cover the back side of the ear up to the edge of the helix, and once more to cover the rest of the ear. To prepare for this step, I marked lines where the second piece of mold should end. Then, with a dremel, I made several indentations in the mold. This is to help keep the mold in place later when I need to take it apart and put it back together. Notice here I also filled the unwanted holes in the defect using wax. Without smoothing the outer parts of the defect, this surface texture may make it difficult to take the mold apart. A thin layer of vaseline was spread over the surface of the mold (not the ear), also helpful for separating the parts of the mold in a later process.
Next, I boxed the base with paper tape. You can also use boxing wax, but I just used the kind of tape that sticks when water is added.
After pouring dental stone under the helix of the ear, I sat the entire mold at an angle so the stone covers the entire area under the helix while it sets. Before the stone set completely, I removed it from parts that leaked over the mark I made earlier, and molded it to parts where more coverage is needed. Once the stone sets completely, I used a dremel again to make holes in the mold, and spread another thin layer of vaseline over the new stone:
The next step involved repeating the process of mixing and pouring the stone, this time covering everything in sight. Once everything sets, I removed the tape and placed everything into boiling water to melt the wax (yes, the same wax I spent the last four weeks sculpting…scary!). You may need to let it boil for a few minutes first, take apart the mold to remove the majority of the wax, and then boil each piece separately to get rid of more wax. Brushing the mold with an old toothbrush and soap also helps with wax removal. Be careful taking things out of the boiling water!
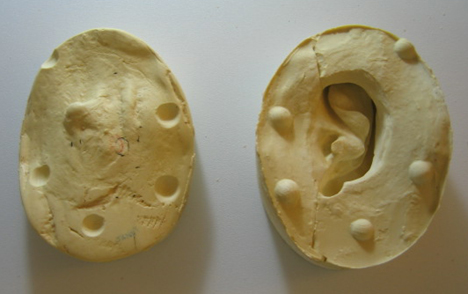
The cleaned mold, shown in two parts. Left: defect; right: two sections of this three-part mold that holds the negative shape of an ear.
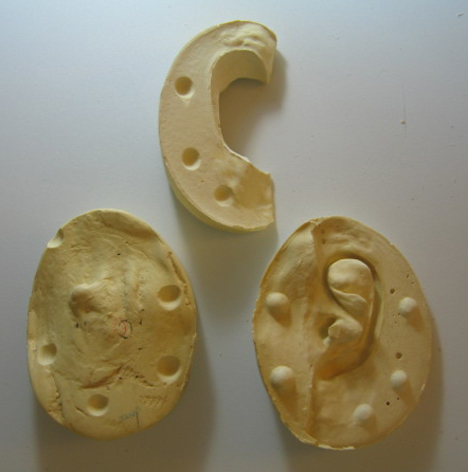
The same mold, shown here in three parts:
Posted in my projects, prosthesis | Tagged: ear, mold making, prosthesis, wax | 1 Comment »
Posted by Janet on February 16, 2008
Nothing new, just finishing up the sculpting. Here’s the set up, very simple.

Ten hours later…
…top view of the “finished” wax ear. All sides were checked for accuracy. The next step will be smoothing and texturing the surfaces.

Posted in my projects, prosthesis | Tagged: ear, prosthesis, sculpting, wax | 1 Comment »
Posted by Janet on February 4, 2008
This week of the ear prosthesis project, I began sculpting the ear from the opposite side using colored wax. I was fortunate enough to get a pot that had already been colored to resemble skin tone. Had that not been the case, I would have to melt some uncolored wax and add crayon shavings until the color is just right. It seems pointless since the wax would be melted in a later process, but in fact the coloring reduces the transparency of the base wax and makes it easier to visualize the final product by making it more “human.”

These pictures aren’t the best since I took them with my cell phone. The one above shows part of my set up for sculpting the wax ear: a pot of melted wax, the base, and the ear cast from last week. The base, also known as the “defect” or “treatment side,” acts as a platform on which I place my wax model. You can see that I have marked up the size and important landmarks of my ear on its surface for reference.

Here is the initial blob of wax, lumped onto the treatment side while it’s still warm and pliable. I quickly molded it into the shape of the mirror image ear with my fingers.

After about three hours of shaping, here’s what the wax model looks like. It’s beginning to take the form of an ear, but to make it perfect will take some more work.
Posted in my projects, prosthesis | Tagged: ear, prosthesis, sculpture, wax | Leave a Comment »
Posted by Janet on January 29, 2008
 I’m taking a modeling class right now and our first project is a human ear prosthesis. It’s very exciting and I will be posting updates until it is done. This picture above shows the cast I made yesterday of a classmate’s ear. Later we’ll be sculpting the opposite ear and eventually making a prosthesis of that ear.
A lot of the materials we use are the same as those used for dental casting. We started by sealing an area outside the ear with boxing wax and stuffing some cotton down our partner’s ear canal. Very quickly we mixed and syringed alginate over the ear, covering everything. Since alginate remains soft and gel-like, some plaster was poured over the whole thing to help the mold hold its form. Once the mold was finished, I mixed some dental stone and poured it into the mold. While waiting for the stone to set, I got a cast of my own ear made by my partner.
Although the process sounds fairly straightforward, it was seven hours before I went home. Part of it was waiting time, and part of it was the time it took to clean up all the imperfections. But at the end of the day I got to take home this piece of ear to show everybody and that makes it all worthwhile.
Posted in my projects, prosthesis | Tagged: 3D, ear, model, prosthesis, sculpture | 1 Comment »
