Revealed

A blog about scientific and medical visualization and all that’s involved.

Archive for March, 2008

DNA Wrapping and Replication

Posted by Janet on March 29, 2008

Update: Here’s a narrated version of “Molecular Visualizations of DNA,” both parts 1 and 2. Thanks Alex B for bringing part 1 to my attention.

Animation: Drew Berry
Script: Max Whitby
Narration: Susan Parke
Sound FX: Franc Tetaz
Time-lapse mitosis: Jeremy Pickette-Heaps

Nice video. Does anybody know who made this? Enjoy!

Posted in animation, biology, videos | Tagged: , , , , | 2 Comments »

Interview–Robert J. Lang

Posted by Janet on March 26, 2008

annas_hummingbird_2.jpg

Robert J. Lang, one of the top origami artists in the world, is well known for his highly realistic and elegant designs in natural subjects. Unlike many other origami artists, he is also a scientist with an extensive engineering background. Over the years, Robert Lang has published many of his design patterns in origami books. His more recent 500+ page publication “Origami Design Secrets” is a serious book on the mathematical theories and underlying principles of origami design. Here, Robert Lang shares his experience as both an origami artist and a scientist.

me: “Tell me a little bit about your background in both science and art.
Robert Lang: “Science-wise, I’ve always been interested in natural history (a love that arose from a childhood of tramping through the woods, playing in the creek, and collecting plants and animals). In high school I became interested in mathematics through books and articles by Martin Gardner. For college, I went to Caltech on the advice of a hiking buddy, and, once there, cycled my major interest through mathematics, computer science, and eventually settled into Electrical Engineering for my BS. After getting my MS from Stanford (also in EE), an interest in lasers led me to Applied Physics, back at Caltech for my PhD. This then led into a career in lasers and optoelectronics, first at NASA/JPL, and then for 9+ years at Spectra Diode Laboratories, a Silicon Valley company that developed and manufactured semiconductor lasers.”
“Artistically, as a child I was interested in various crafts which I took up and abandoned (sometimes several times), but I’ve never really had any formal artistic training. But after folding representational figures for 40-odd years (and drawing tens of thousands of diagrams of same), I’ve started to get a little bit of an eye for form.”

me: “What was your first experience with origami like?
Robert Lang: “My first experience happened when I was 6 years old, so I don’t remember it all that well. A teacher gave me a book that had some folding instructions in it. I saw it as a fun puzzle to try to work out. I do remember that origami seemed like a great way to make toys from free materials, i.e., scrap paper.”

me: “When did you begin designing your own origami compositions?
Robert Lang: “It’s always hard to draw the line between “modifying an existing design” and “designing one’s own composition.” Certainly I tried modifying the designs I was folding from my books almost immediately. But I would guess that by my early teens I was coming up with my own figures.”

me: “Can you summarize the general steps you take to design a new piece of work?
Robert Lang: “It varies a lot, depending on whether the figure is simple or complex. For a complex figure, I try to break down the subject into its component parts, figure out how to attack the individual parts, and figure out how they’ll all interact with each other in the overall design.”

me: “How has the process of designing your work refined over the years?
Robert Lang: “When I started out, I designed origami the way most people did: somewhat by trial and error. Over time, I built up a collection of techniques for solving individual problems: how do you turn a flap into a leg, or how do you make a rounded shape. Eventually, I began to recognize common principles that lay behind many different techniques, which allowed me to construct my own techniques; and even later, I figured out how to describe those principles mathematically, which led to further design advances.”

me: “Do you make everything out of one sheet of square paper?
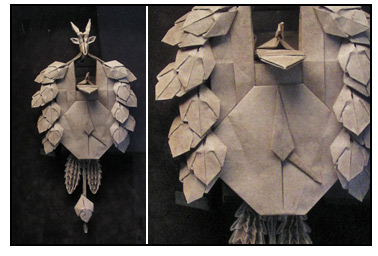
Robert Lang: “Certainly not! There are many genres of origami, including modular origami (many identical units from multiple sheets, such as my K2), composite origami (different parts of the subject from different sheets, such as my Orchid), and different shapes (such as my recent pots, which are from regular N-sided polygons). I fold in all genres, but probably 80-90% of what I do is from a single square, what is called in Japanese, fu-setsu sei-hokkei ichi-mai ori.”
orchid.jpgk2.jpgallosaurus.jpgallosaurus_1.jpg
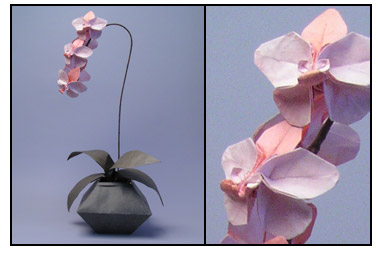
Above: “Orchid,” “K2,” and “Allosaurus Skeleton” (side and front views) are examples of origami that are not made from a single sheet of square paper.

me: “Why do you choose to make natural subjects more often than objects and geometric shapes?
Robert Lang: “Nature, and natural subjects, inspire an emotional response that objects don’t. When I’ve folding an animal, I’m not trying to create a photograph of the animal; I’m trying to create an emotional response in the observer that is the same response I feel when I see the actual subject. So while I’ve done plenty of geometrics and objects, the subjects I get passionate about are natural.
tree_frog.jpg

me: “Which designs and books by you are you most proud of and why?
Robert Lang: “The book I am most proud of is Origami Design Secrets. The part of origami that I find most satisfying is creating a new figure, and by teaching people how to design, ODS allows others to experience that same rush.”
“As far as origami designs, usually one of my most recent ones is the one I’m most proud of! At the moment, that would probably be my Barn Owl, opus 508.”
cover-thumbnail.jpgbarn_owl.jpg

me: “In your opinion, how does origami contribute to the field of technology, mathematics, or other types of science?
Robert Lang: “There is a general contribution in that I think that origami exercises the parts of the mind that are often used in technology, mathematics, and other types of science. But it has also turned out that many origami structures have been found to be useful in technology in fields ranging from medicine to space exploration.”

me: “How does your background in science help you develop your works in origami and vice versa?
Robert Lang: “There is a principle in science, most famously expressed by Newton: ‘we stand on the shoulders of giants.’ I like to put it a little bit differently: ‘the secret to productivity is letting dead people do your work for you.’ Meaning, if you can figure out how to relate your problem to an unrelated problem that someone else has already solved, you can make use of their results to advance your own endeavor. By casting certain origami problems into mathematical form, I’ve been able to make use of existing solutions to those mathematical problems, and thus advance my origami artwork.”
“So in that way, science has aided my origami. Now, the reverse direction is less clear-cut; I can’t point to a specific way that origami has assisted my work on lasers and optoelectronics. However, I would say that a lifetime of visualizing complex 2-D surfaces (in origami) has been good practice for visualizing the optical fields, electronic wavefunctions, and complex functional forms that arise in theoretical laser physics. I am pretty good at mathematical analysis, but I have always visualized mathematical concepts as physical shapes and surfaces. So while origami may not have contributed directly to my work in those fields, it kept my primary instrument well-exercised.”

me: “Is it common within the field of origami to have an extensive science background? If not, do you feel that it puts you in an advantage?
Robert Lang: “There are other scientists in origami, to be sure: Brian Chan, one of the rising stars of American folding, is a mechanical engineering graduate student at MIT, for example. But internationally, most well-known origami artists are not scientists. In fact, perhaps not surprisingly, given origami’s growing status as an art, many of them are trained as general artists. As origami gains respectability within the wider artistic community, I would expect that more and more origami artists will come to origami with a mainstream art background.”
“For myself, though, my scientific training and approach has allowed me to accomplish artistic goals that I could not have accomplished otherwise. This is not to say that others couldn’t accomplish the same thing without science: just that, given my own mix of talents and limitations, my scientific talents have enabled me in some cases to overcome certain artistic limitations.”

Thanks to Robert Lang for sharing his thoughts and artworks. His website can be viewed at http://www.langorigami.com/index.php4. Here are a few more of my favorites (they can all be found on his website):

aechmea.jpgbanana_slug.jpgflying_walking_stick.jpg
sand_dollar.jpgmaine_lobster.jpglion.jpg
bfcc.jpg

Posted in interviews, math/engineering | Tagged: , , | 1 Comment »

Revealed on Street Anatomy

Posted by Janet on March 24, 2008

revealed-street-anatomy.jpg
“Revealed” is featured on the Street Anatomy blog today. Vanessa Ruiz, the author of Street Anatomy, gave me a lot of advice getting this blog started. She continues to check with me regularly and offers me new tips. I could not have done this without her and would like to thank her for introducing my blog to the Street Anatomy audience. To see the featured entry, go here.

Posted in announcements | Leave a Comment »

Ear Prosthesis Part 4

Posted by Janet on March 24, 2008

The next step in the process–making of the final product, can be best referred to as intrinsic coloring. It is called intrinsic coloring because the color agents are mixed into the material itself and is therefore more permanent than extrinsic coloring, in which the color is painted on top of the material. In this process, the material that makes up the bulk of the prosthesis is mixed with substances for coloring and texture, painting onto the mold in layers, and oven cured. The method presented here is only one of a few methods used to color the ear.

I started first by making a base color, a semi-opaque skin-toned mixture to use for the bulk of the prosthesis. A platinum silicone elastomer, a transparent colorless substance with the consistency of molasses, is mixed with some kaolin clay for increased opacity. Primary colors are gradually added until the color matches the base color of skin fairly well. The base color is determined by looking at the “underlying-most” layer of color on a person’s skin; it is the color you would see on a person’s skin if the skin is stripped of any coloration due to blood vessels, moles, freckles, etc. Occasionally, white pigment is added to increase opacity. Other pigments that closer resemble skin tones can also be added, but is it not necessary to do so. Flocking, short colored fibers, are also added for subtle color change and to texturize the mixture. Tiny red fibers from the flocking can mimic capillaries very well.
mixing-kaolin.jpgcoloring.jpgflocking.jpgbase-color.jpg
Above: Mixing kaolin into silicone, silicone coloring, flocking, and the final base color.

Several other colors mixtures are made to resemble different colors that make up the ear. A small amount of white and yellow was added to a separated portion of the base to make a cartilage color. Three more transparent colors–red, gold, and green, were made the same way but kept transparent by leaving out kaolin clay and white pigments. These colors will be used for the helix and other areas of the ear where capillaries are more prominent, a golden undertone overlying parts of the skin, and shaded areas, respectively.

When all the colors are mixed, they are ready to be painted into the mold layer by layer. A catalyst is first added to the silicone and mixed well. The silicone is then placed on a piece of class and spread thinly for air removal. Afterwards, they are collected back into a small container and painted into the mold by using a paint brush. Each layer was lightly cured in an oven before the next layer was painted on. Occasionally I added flocking and tiny strands of colored yarn between layers to resemble small vessels. The order of which I painted the colors are red, gold, shade, and cartilage color. When everything else was completed, I closed the mold and filled the entire mold with the base color.
paint-preparation.jpg
Above (cw from top left): Red layer (empty), gold layer, shade layer, base, cartilage color. Everything is sitting on top of glass. In the center, a spatula is being used to spread out a catalyzed red mixture for air removal.

The mold is then pressed tightly for the excess silicone to flow out. It is cured in an oven at 75 degrees Celcius for two hours.
mold-press.jpg
Above: Two molds in a press. Paper towels were places above and below the molds for cushioning.

When the silicone is cured, the mold is removed from the oven and cooled to room temperature. It can be difficult to open the mold even with a separating agent between the pieces.
cast-removal.jpguntrimmed-ear.jpg
Above Left (Top): An open mold showing the back side of the ear.
Above Right (Bottom): The prosthetic ear as it was when completely separated from the mold.

The resulting ear was slightly yellower and greener than intended. Since the layers are painted in reverse order on the mold from outside in, it takes experience and experimentation to get a good match. For my ear, I will be trimming the excess material and refining the coloration using extrinsic colors later.

Posted in my projects, prosthesis | Tagged: , , | 3 Comments »

Visualizing Medicine at UIC

Posted by Janet on March 23, 2008

visualizingmedicineflyer.jpg“Visualizing Medicine: A Gallery Show by the Student Association of Medical Artists” exhibits some works from this year’s Biomedical Visualization students. The exhibit takes place in University of Illinois at Chicago’s Art Lounge at Student Center West from March 31, 2008 to May 2, 2008 and is open to the public. Please join us for a reception on April 3, 4pm to 7pm.

Posted in announcements | Tagged: , | 1 Comment »

Prehistoric Science Comes Alive!

Posted by Janet on March 18, 2008

The Museum of Science and Industry in Chicago is currently showing “Sea Monsters: A Prehistoric Adventure” and “Dinosaurs Alive!” on its Omnimax Theater.

prehistoric.jpg
“Sea Monsters,” a film by National Geographic, brings together discoveries of ancient water creatures in this high resolution photorealistic animation. To see the trailor, synopsis, and show times, go here. This film is playing seven days a week until May 22, 2008.

dinosaurs.jpg
“Dinosaurs Alive!” combines historical footage and fossil evidence with today’s technology, and uses CGI to bring dinosaurs to life. Click here for the trailor, synopsis, and show times. It is also playing seven days a week through October 9, 2009.

The Museum of Science and Industry normally opens Monday through Saturday from 9:30 a.m. to 4 p.m and Sunday from 11 a.m. to 4 p.m. It opens every day except Christmas. The museum has gone through a series of renovations, and now has several new and improved exhibits on cutting edge science. For example, the “baby chick” exhibit is now part of a DNA/genetics exhibit. Newer exhibits include “Earth Revealed”–a permanent exhibit that looks at our planet Earth as a living system, and “The Glass Experience”–a temporary exhibit that looks at glass from the artistic, historical, and technological standpoint. http://www.msichicago.org/

Posted in animation, paleontology, videos | Tagged: , , , , , | Leave a Comment »

A Heart, A Wishbone, and A Bird

Posted by Janet on March 14, 2008

walteria-paper-weights.jpg
In addition to illustrating science, I’m also a big fan of product design. So I always get excited when I see products that incorporate certain aspects of scientific illustration in them, whether a conscious choice of the designer or not. The picture above–a heart, a wishbone, and a bird, is a series of paperweights by Walteria Living, who apparently also carry the Endangered Species Chocolates. All three paperweights are cast in bronze from the real thing. http://www.walterialiving.com/.

Posted in miscellaneous, sculpture, stores/products | Tagged: , , , , | 1 Comment »

Pixar Internships

Posted by Janet on March 12, 2008

Pixar is offering a variety of paid internships this summer and fall for students of the college to graduate level. The job descriptions, qualifications, and deadlines all vary, so the best thing to do is to go to http://www.pixar.com/companyinfo/jobs/grads.html and look through their list of postings by clicking links on the left hand column. There’s a number of March 15 deadlines, but also a few deadlines for later this month as well as April. Typically the internships are offered in areas such as animation, design, story development, management, technical direction, engineering, marketing, and editorial. It’s really a mix of skills. If you are interested, don’t be intimidated if you don’t think you qualify for one thing because you may just qualify for another. Housing or stipend will be provided.

Alternatively, if you are more experienced and are looking for a job position rather than a paid internship, the list of job postings can be accessed through http://www.pixar.com/companyinfo/jobs/index.html by clicking on “Career Listings” next to Mike Wazowski (big green eye).

Posted in announcements | Tagged: , | Leave a Comment »

Body Videos

Posted by Janet on March 8, 2008

Last Sunday on the Discovery Channel we saw the first two episodes of the mini-series Human Body: Pushing the Limits. Here is a video excerpt from episode 1–“Strength.”

The last two episodes, “Sensation” and “Brain Power,” premiere this Sunday, March 9. Click here for the episode guide.

If you missed the series but would like to buy the DVD, it is available for $29.95 (or Blu-ray $39.95) at the Discovery Channel Store. You can also watch excerpts from all four episodes on http://dsc.discovery.com/video/ by clicking on “Human Body” in the left hand column.

Posted in anatomy, animation, announcements, videos | Tagged: , , , | Leave a Comment »

Early Illustration/Printing

Posted by Janet on March 7, 2008

About a year ago, I visited a friend in Albany, CA, and discovered a collection of early scientific illustration in his home. So after I started this blog, I asked if he would be willing to send me some photographs of these illustrations. Not only did he send me pictures, but he was so generous that he also type up a page of information about the history of early illustrated prints. Here are photos and his descriptions of these prints (with minor paraphrasing):

“Prior to about 1440, books were written by hand and illustrations were also done by artists by hand.

About 1440, with the invention of movable metal type by Johann Gutenberg, book printing grew rapidly. Among the first illustrated books printed were Herbals–books with woodcuts of plants. Woodcut plates were printed in black outline and often hand-colored using watercolors. These plates below were from the Herbal Hortus Sanitatus printed in Mainz in 1490 and probably colored sometime in the 18th century. The plates and texts were printed on heavy cotton or linen paper. The early Herbals are still around in old antique shops, the internet, or other unusual sources, but usually only pages removed from them are to be found. They are not too expensive but not that easy to come across.
woodcut-plant1.jpgwoodcut-plant2.jpg

Line plates were printed from the earliest times of publishing until well into the 19th century. Early scientific books were usually hand-colored by housewives who were paid per plate. The Audubon and Wilson bird books were done this way. Also see examples below:
peale-turkey.jpgwilson-birds.jpg
Left (Top): Wild Turkey, Male and Female. Drawn from Nature by Titian R. Peale. Engraved by W. H. Lizars
Right (Bottom): American Sparrow Hawk, Field Sparrow, Tree Sparrow, Song Sparrow, Chipping Sparrow, Song Bird. Drawn from Nature by A. Wilson. Engraved by W. H. Lizars

Early in the 19th century, plates were prepared by etching images on heavy clay blocks–one block for each primary color. The blocks were inked and printed three times–once for each color. This method was slow and very costly.
bird-plate-i.jpgbird-plate-viii.jpg
Left (Top): Birds–Plate I, From the Pacific Railroad Surveys ‘U.S.P.R.R. Exp & Surveys–32nd Parallel (West)’
Right (Bottom): Birds–
Plate VIII, From the Pacific Railroad Surveys ‘U.S.P.R.R. Exp & Surveys–Cal & Oregon’

By the middle 1800’s, lithography was introduced where ‘dots’ of the primary colors were printed resulting in color illustrations, much like the modified versions we still use today. High quality illustrations used up to nine plates of different colors per printed sheet–very expensive but used in fine art books and limited edition art plates. Each plate had to be printed over using the shade of color and the printings have to be accurately ‘registered,’ or lined up.

Paper changed greatly during the advent of printing. The earliest paper was produced by putting a fiber slurry onto a metal sheet and peeling it off after drying. By about 1520, paper was made by dipping a fine screen into the slurry. This paper, used until the end of the 18th century, had watermarks on the screen and was called ‘laid paper.’ Today, (wove) paper is made using similar method of the earliest paper but done automatically on rollers.”

Thanks to Ted of Albany, CA for providing the photos and contents.

Posted in botanical, zoological | Tagged: , , , | 1 Comment »